
Almost eight years ago I began down a path that would completely change my life in so many different ways…
I became a blogger.
When I first started, I had no clue what I was doing.
I started my blog at a free .blogspot address (does anyone remember when Surviving The Stores was survivingthestores.blogspot.com??), I knew absolutely nothing about coding or designing graphics, and I had no idea that blogging could actually produce an income for our family!
I originally started Surviving The Stores for myself. To have a place to keep myself accountable to stick to my grocery budget each month.
But over the next several years this little blog turned into a full-time income for our family.
When Ryan was laid off in 2010, just two years after I began Surviving The Stores, he was able to stay home and help me grow the site to make a solid six-figure income each year!
We had always dreamt of going into business for ourselves (and oh I should tell you some of the crazy ideas we had in our early married years!) but never imagined that it would come through me starting a blog.
One of the things that I wish I would’ve known when I first started blogging was just how easy it would’ve been to start my blog off right.
As I mentioned, I started off with a .blogspot address because I thought it would be easy. But over the next couple of years, something happened that had me regretting that decision…
I had two blogging friends who had their blogs completely shut down by Blogspot.
These were two bloggers that I admired, who had INCREDIBLE blogs, and who truly cared for the people that read their sites every day.
And one day their sites were just gone.
You see, when you have a free .blogspot blog or even a free wordpress.com blog, you don’t actually own your blog. Google (who owns blogger/blogspot) or WordPress owns it.
When you SELF-HOST (which sounds scary, but I promise it’s not!) then not only do you completely own your own content, but you can have advertisements on your blog as well. Yes, you can currently have advertisements with a .blogspot address (although don’t have too many – that’s why my friends’ sites were shut down on blogspot), but if you have a wordpress.com website then you agree in their terms not to have any advertisements on your blog.
I’ve asked many bloggers over the years what they wish they would’ve done differently at the beginning of their blogging journey, and almost without fail they say, “I wish I would’ve started off with a self-hosted blog.”
And that answer is exactly my answer as well. If I could go back 8 years and tell myself just ONE thing, it would be to start out blogging with the steps I’m going to show you below.
Before we get started though, I want you to take a big deep breath.
No, really… take it.
Now release that breath and with it release all of the anxiety, worry, and the overwhelming feelings that you’ve ever felt previously about starting a blog on your own.
You CAN do this. I’m going to hold your hand through the entire process and I promise it will be EASY. So much easier than you ever thought it would be!
Are you ready?
Let’s get started!!
I highly recommended getting started with a hosting company that has a great balance of being easy to use, reliable, and very affordable.
The company that I recommend that meets all of those criteria is a hosting company called Bluehost.
Step 1: Picking your blog name!
**If you already have your blog name and .com address through another website, then you can skip to step #2.**
Parents spend months brainstorming the perfect name for their new little one. This will be the name that the child will likely have for their entire life and the parents want it to be perfect for them.
I remember I was pregnant with our first child. Ryan and I scoured through the baby name books and websites until we found the name that we believed would be the perfect fit for our new little girl.
When choosing a name for your blog, I think it helps to think about it somewhat like you would when you name your child. Yes, yes, there are definitely big differences. But just go with with me here…
Does the name encompass what you want your blog to be about?
Many parents pick names for their children based off of what they envision for their children’s lives. Maybe you pick a name that means “courage” or “peace” or “freedom”.
With your blog, you want a name that also can sum up what you desire your blog to be focused on. You want a name that can encompass everything that you want to write about and that doesn’t box you out of things that you might want to potentially write about down the road.
For example, if your blog name is “AllAboutQuilting.com” then you’ll likely never be able to branch out and talk about politics if that’s something that you want to be able to write about. 🙂
You want your blog name to convey a little about what someone might see on your blog, but yet not box you in too much to where you will not be able to write about everything you want to write about!
There is one other quick issue that we need to be aware of when we choose our blog name: Trademarks
What is a trademark?
A trademark, trade mark, or trade-mark is a distinctive sign or indicator used by an individual, business organization, or other legal entity to identify that the products or services to consumers with which the trademark appears originate from a unique source, and to distinguish its products or services from those of other entities.
A trademark is typically a name, word, phrase, logo, symbol, design, image, or a combination of these elements. See more description on Wikipedia.
We really could have several posts on trademarks since there’s so much information out there and I highly recommend researching more if you have the time (especially anything related to domain names).
But for our purposes, we are just wanting to make sure that our blog name does not infringe upon anyone else’s trademark.
Here’s how to get started checking: (it’s always best to talk to a lawyer who specialized in trademarks, so please do not take any of the follow as legal advice)
1. Before buying your domain, do a Google Search for what you think you want your name to be. Look through the results that come up and see if anyone else is using that name, or a similar variation, for business purposes. If so, then they likely at least have “common law trademark” and could attempt to sue you for copying their name.
2. If a site has a Registered Trademark, then they have taken it a step further and it is imperative that you find a name that’s very different from theirs. When a website owner gets a registered trademark, that means that they are wanting to make sure no one can get a name similar to theirs and will be enforcing that (through a cease and desist letter and then potential lawsuit). You can check for registered trademarks here.
3. Be careful with websites that have trademarked product or company names in them. It’s not *always* a no-no to use them, but you want to be super careful with it. The safest thing to do is to contact the company and ask.
For example, several years ago there was a Facebook page called Crock Pot Girls that got really popular in a very short time span and they ended up gaining over a million fans in just a couple of weeks.
The problem though, is that the name “Crock Pot” is a registered trademark owned by Sunbeam. So it could have gone one of two ways, either (1) Sunbeam wants to maintain exclusive rights to that name and sends them a cease & desist letter or (2) Sunbeam is thrilled with the exposure of their brand and is enjoying the free advertising. (Personally, I think they should’ve just soaked up the free advertising and let it continue on!)
Unfortunately for the Crock Pot Girls, Sunbeam chose the first option and Crock Pot Girls had to rebrand to the Crockin’ Girls.
Basically, it all comes down to this: Do your research!
Make sure no one else is already using the name that you want (or a similar variation) for business purposes, and if you want to use a brand or product name in your title then ask first. (And if you don’t get a response, don’t do it!)
Please keep in mind that I’m not a lawyer and this is should not be construed as legal advice. I recommend talking to a licensed attorney if you have any questions about trademarks.
Once you have your name (or a few names) in mind, it’s time to move on to step 2!
Step 2: Buy your domain name (your .com address) & Hosting Plan
Bluehost has made the entire process as easy and non-overwhelming as possible, and they offer a free .com domain name when you get a hosting plan through them!
If you’ve already bought your domain name previously (through a company other than Bluehost, like GoDaddy for example), that’s ok too! I will step you through exactly what to do.
Bluehost has an AMAZING deal right now when you get a hosting plan through Surviving The Stores!
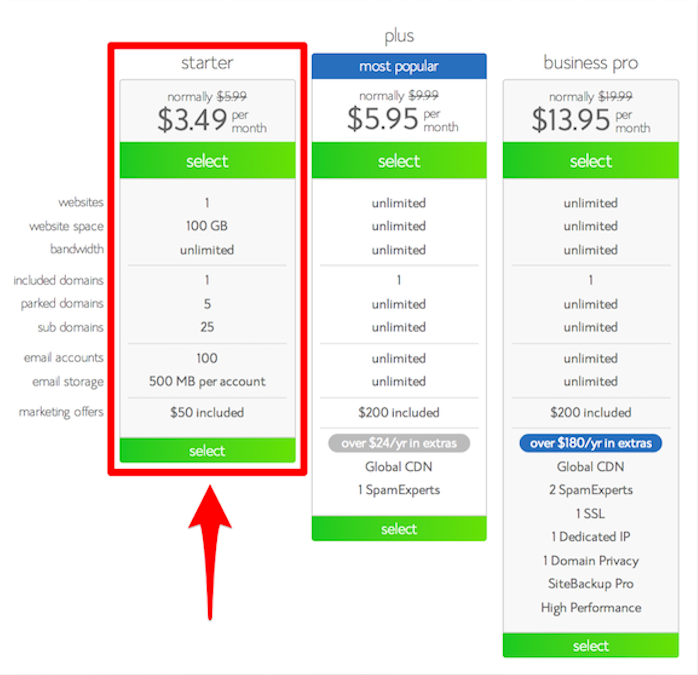
You can get hosting for as low as $3.49 per month, which is a deal that I negotiated with Bluehost just for you guys and is THE absolute best deal out there! You can only get this deal by clicking on this link here through Surviving The Stores.
It goes up in price a little depending on how far in advance you want to pay, but even if you only wanted to do 12 months at a time, the price just can’t be beat.
PLUS, you get your domain address (your .com address) completely free when you buy at least a 12 month hosting plan from Bluehost!
Click here to head to the Bluehost website (the great deal is above is only available through this link).
Click on the button that says “Get Started Now”
Then click on the hosting plan you want. I highly recommend getting just the “Basic” plan for now. You can always upgrade later if you need to.
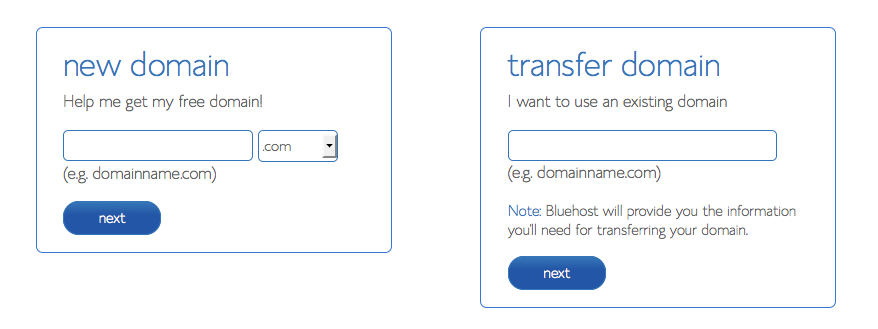
If you DON’T already have your domain name purchased, then in the left section type in the domain you want to buy to see if it’s available. If not, try some of your backup domain names until you find a domain name that is available.
If you DO already have your domain name purchased, then in the right section type in the domain that you already have.
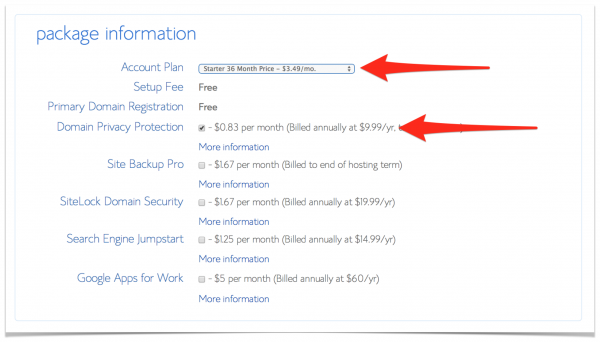
The next page is the purchase page. The only upgrade that I recommend everyone do is the “Domain Privacy Protection” which is only an extra 99¢ per month so that no one can easily look up your personal information. It’s something that’s extra, but I think it’s definitely worth it!
When you pay, you can click on the “More Payment Options” and even pay with PayPal! I always love when you can pay with PayPal so that you don’t have to give out any credit card info online.
Once your domain is purchased you will be taken back to the BlueHost site (from Paypal if that’s what you used) and it will tell you to set your password. You must pick something that has at least 8 characters, 1 uppercase letter, 1 lowercase letter, 1 number, and 1 symbol. Having a password that’s hard for someone to guess will make it much harder for someone to hack into your account!
Step 3: Install WordPress To Your Self-Hosted Blog
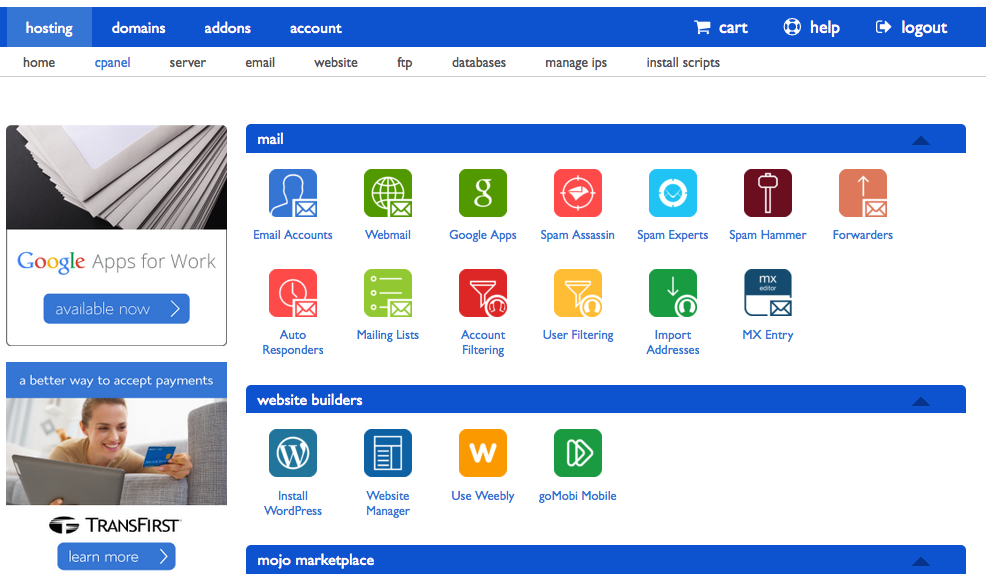
After your password is set, you will log into your account with your email address and the password that you just set up, and you will be automatically taken to what is called the cPanel. cPanel stands for “Control Panel” and all it means is that this is where you go to control what is on your account.
Many people are very intimidated when they first go to this page, and I’m no exception!
Just keep in mind that after you set up WordPress on your website, you will likely NEVER have to go back into this Control Panel. (Good news, right?)
Did that last picture look a little overwhelming to you? It does to me! But there is only one button that we are looking for on this screen, and that’s the “WordPress” button.
Just scroll down (if you need to) until you see the section called “Website Builders” and click on the icon that says “Install WordPress”.
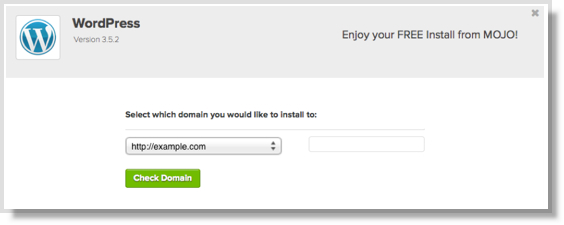
Choose the website name from the drop-down list then press “Check Domain”.
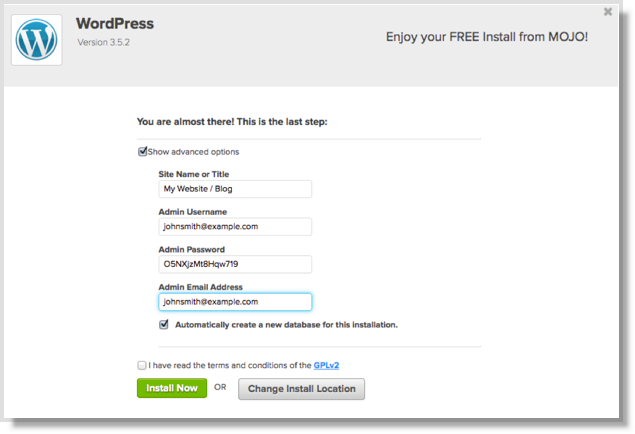
On the next screen, fill out the information requested and then click the “Install” button!
Woohoo!! You’re almost there!!
After WordPress finishes installing on your website, go to yoursitename.com/wp-admin (for example, I go to https://www.survivingthestores.com/wp-admin for my website) to log into your new dashboard with the login information you just created. This is where you will do pretty much everything related to your blog.
Now take a look at your new site by going to http://www.yoursitename.com! It’s very basic right now, but it’s a BLOG and it’s a blog that YOU OWN!
**NOTE: Some people like to keep going and set up EVERYTHING in one day, and some like to get their blog set up to this point and then come back and do the next part another day. Either way is completely fine! 🙂 **
Step 4: Install a THEME
Your blog is set up and ready to start posting if you want to go ahead and get started. But most people like to invest a little money into a custom theme for their blog so that it looks more professional.
What is a “theme”?
THEME: A template designed specifically for use to enhance the visual appearance and usability of a blog.
A theme is just something that you put around your blog (i.e. your content). Your blog theme is what makes your site visually appealing and easy for your readers to find things.
You are going to want to get BOTH the GENESIS Framework, and then get what’s called a “child theme” after that.
The official Studiopress child-themes are very professional, but some people feel like they can look a little too “businessy”. So one website that has a TON of beautiful child-themes that typically appeal more to women is Pretty Darn Cute Themes.
There are many other websites that offer themes, but those two are the ones I’ve consistently been impressed with.
By purchasing one of these child-themes, you can make your blog look like a professional website with literally just the click of a button and you can have a very nice looking blog set up in a very short amount of time.
Want to see?
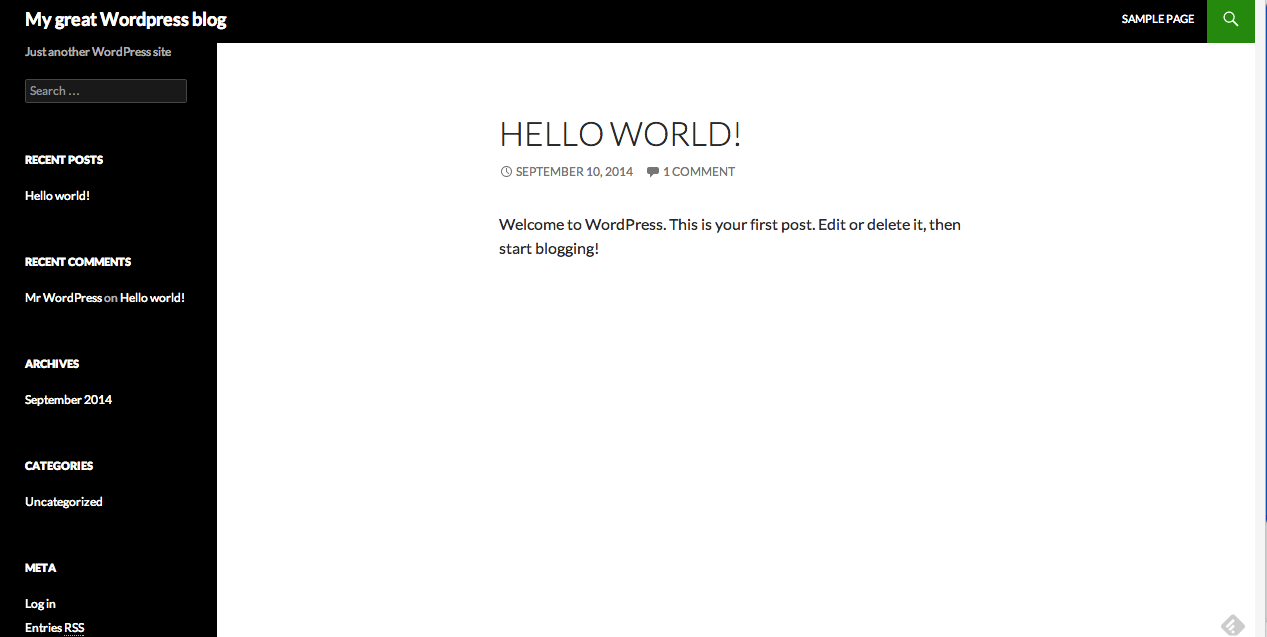
I’ll pick up where we left off with our new self-hosted WordPress blog!
Doesn’t it look pretty?
Okay, maybe not. I’d like to have just a little more design to it (or a LOT more design!)
Before we can install one of the child themes to make it look nice, we have to install the Genesis Framework.
After you download the Genesis Framework from Studiopress here (if you’re purchasing one of the Studiopress child themes then you can buy the child theme and Genesis as a package, but if you are wanting a Pretty Darn Cute theme then you’ll need to purchase the Genesis Framework separately), they will give you a .zip file that you will download to your computer.
If you’re using a theme from Pretty Darn Cute, then also just download the .zip file that they give you when you purchase.
Log into your dashboard (found at yoursiteaddress.com/wp-admin) and put in your login name and password.
Then scroll down to where it says “Appearance” and then click on “Themes”.
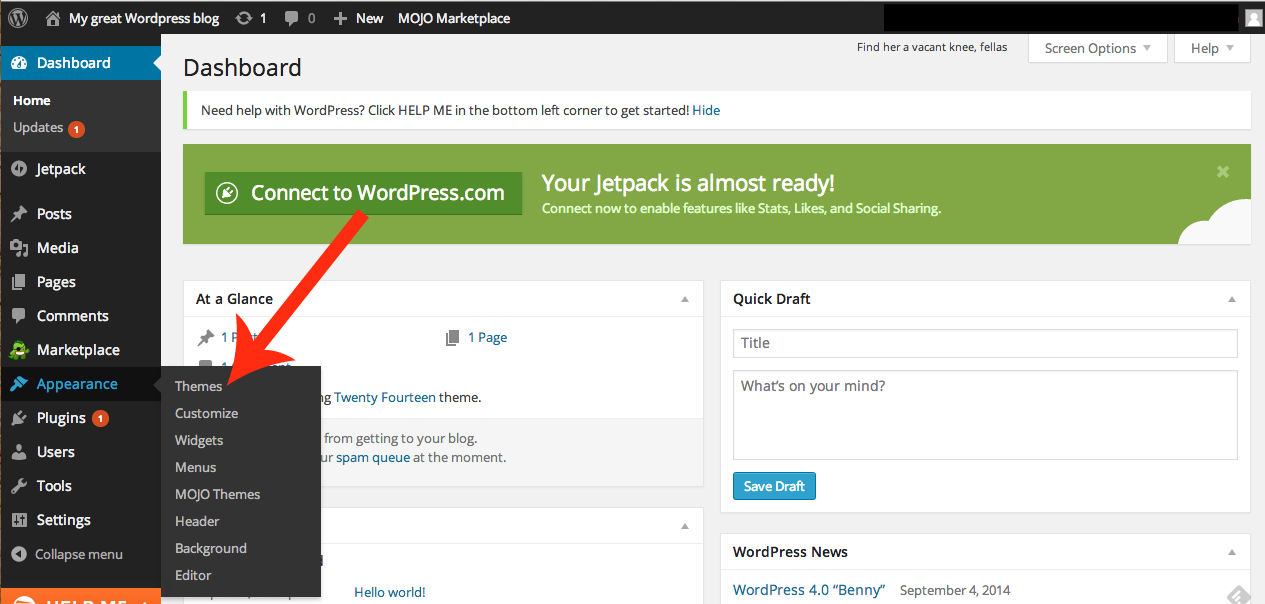
Upload your Genesis .zip file FIRST and activate it.
After Genesis is installed, THEN follow the same steps as above to upload the child theme .zip file (either from Studiopress or from Pretty Darn Cute).
Click on “Activate”.
TADA!!
You’ll need to play around with it a little to get it to look exactly how you want it to look, but Pretty Darn Cute themes or Studiopress Help Forums will step you through EXACTLY what you need to do!
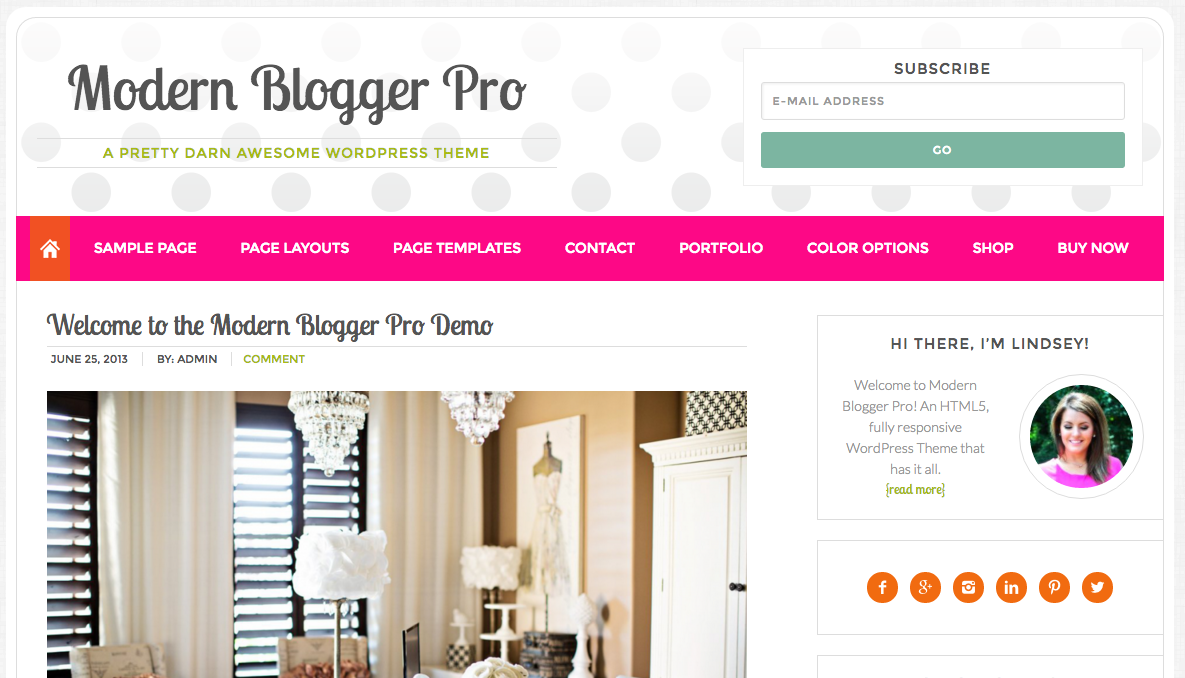
Here’s one of the finished products from Pretty Darn Cute!
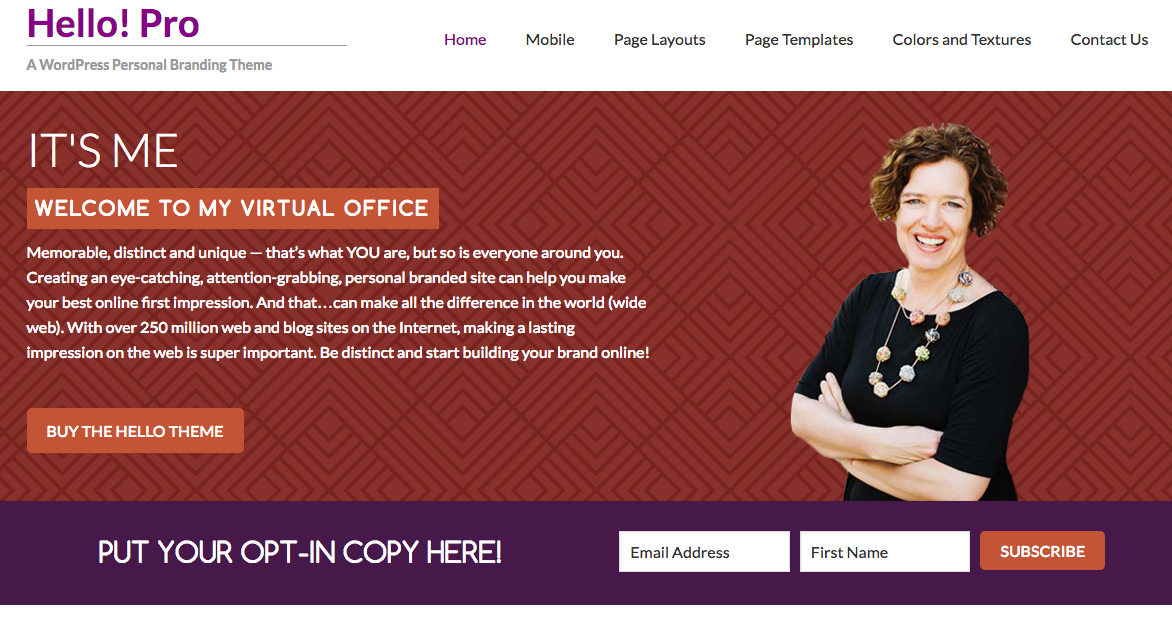
And here’s what it could look like with a Studiopress child theme!
Ahh… now it’s looking like something that we would want to share with others!
When you purchase Genesis, you have access to their support forums which are FILLED with resources and helpful people to help answer your questions. I’ve been thoroughly impressed over the years with the support that Genesis (through the Studiopress website) offers.
Those pictures from Pretty Darn Cute themes and Studiopress look MUCH better than that original WordPress blog that we started with, right? And you would’ve had to pay a lot of money for this much customization for your navigation bar, widgets, and sidebars if you would’ve hired a designer to do all of this for you!
Step 5: Start Posting!
Now that you have your blog set up, go into your dashboard (the screen that shows up when you log in to your wp-admin section) and click on “Posts” then “Add New”.
Create your very first post on your new blog and publish!
Doesn’t that feel amazing??
You can find more resources for building your blog by watching the following videos on YouTube. There are LOTS of great WordPress videos on Youtube that can step you through just about anything, but here are three that I recommend starting with.
What’s the Difference Between a Page and a Post?
How to Write a New Post
How to Add a Navigation Menu in WordPress
Leave a Reply