
Have you ever had buttermilk scones?
Not the ones that you can get pre-made at the store, but REAL, homemade buttermilk scones. OH MY!! They are absolutely incredible!
A few years ago we had a neighbor who would have regular tea parties at her house (she had 3 daughters) and she always made these incredible scones.
One day I asked her if she might possibly share her scones recipe with me (I was sure it was some kind of family secret) and she was more than happy to tell me that she adapted the recipe from the Food Network website.
So, I thought I would share this fabulous scones recipe with you guys in case you want to make a frugal dessert that everyone will go crazy for!
The directions that my neighbor gave me were very specific (like cutting the butter into the flour and only kneading the dough 12 times), but I gave this recipe to a friend and when she makes it she melts the butter in the microwave and kneads the dough a ton and the scones still come out tasting great!
The recipe below is the “official” way to make it, but your guests probably won’t notice if you take a few short-cuts. 🙂
Print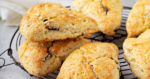
Homemade Buttermilk Scones Recipe
Description
The best homemade buttermilk scones recipe ever!
Ingredients
3 cups of flour (you can use all white, all whole wheat, or mix the two)
1/3 cup of sugar
2 1/2 tsp. Baking Powder
1/2 tsp. Baking Soda (make sure you don’t get the two mixed up!) 🙂
1 tsp. salt
3/4 cup of butter (that’s 1 1/2 sticks) at room temperature
Whatever you want to put in them (chocolate chips, white chocolate chips and craisins, cinnamon chips… be creative!)
1 cup of Buttermilk (you can use already made buttermilk or you can make your own buttermilk!)
Cream to brush on top of the scones before you bake them
Instructions
Preheat your oven to 400 degrees.
Put the flour, sugar, baking powder, baking soda, and salt into a bowl and mix well. Add the butter.
Mix the butter into the dry ingredient mixture with your hands until thoroughly mixed through. It will still be crumbly, but will stay together when you squeeze it with your hands. (You could also use a pastry cutter instead of your hands.)
Add your chocolate chips or whatever else you want to put in them.
Make a small hole in the middle of the mixture and pour in the buttermilk. Stir the buttermilk into the flour/butter mixture until JUST combined.
Lightly knead the dough 12 times turning your bowl 1/4 turn each time you knead it. Don’t press down on it like you would with bread or the scones won’t rise as well… I would say I press down about half what I would for bread. It will still be pretty wet when you are finished kneading it.
You can make 16 large scones or 32 small scones. I usually make the small scones because I feel better about having seconds (or thirds… or….) 🙂 To make the 32 small scones, cut the kneaded dough into four equal sections. Take one section out at a time, form it into a circle, and lightly press it down on the cutting board.
Cut the circle into 8 equal pieces and put each piece on a GREASED cookie sheet. Repeat with remaining dough sections.
Brush the tops of the scones with heavy cream.
Bake for 11-15 minutes, depending on your oven.
Enjoy!! (And don’t eat TOO many!) I love my scones plain, but some like to serve them with jelly or homemade whipped cream.
Scones are just delightful. Especially ones with chocolate in them. The end.
🙂 Thanks for sharing this – I really need to try to make some scones!
These truly were the best scones I’ve ever had. Many thanks
I made these for a brunch at work and got so many compliments. People said they were the best scone they’ve ever had and asked for my recipe. I made a batch with blueberries and another with cranberries and chocolate chips.